Tuesday, 8 December 2015

(Solved) Access Is Denied Message After Sysprep.


Problem:

If you use Sysprep to prepare a Windows VM for imaging you set “User cannot change password” at the administrators password then sysprep will not clear this setting, but will set the “User must change password at next logon” setting. Above metioned two settings are mutually exclusive, butin this case (for sysprep) it seems they can both end up being set.
Which means you get prompted to reset you password at first logon after sysprep completes and then find you are receiving error: “Access Denied” as the response.

Solution:

For being able to logon to your machine following the above issue, you'll need the Offline NT Password tool,to blank out the administrators password and unlock the account. These are options 1 and 4 during the password reset stage. Full instructions are as follows:
  1. Boot the server with the issue with the Offline NT Password and Registry Editor iso file attached to the VM:
    [image%255B2%255D.png]
  2. Select the correct boot option (or just press Enter for the defaults):
    [image%255B5%255D.png]
  3. For Windows 7 and Windows 2008 and later select Option 2 .For Vista and earlier select the default of Option 1.  (to boot into the second partition on the disk). You will need to select a different option if you have more partitions. You need to select the partition that Windows is installed on.
  4. If the disk is marked as Read-Only ensure that the server went through a clean boot and was not shutdown improperly. Once the messages indicate a writable partition
    [image%255B14%255D.png]
  5. Select the presented folder (by pressing Enter again). You can typically just press Enter through most of these  following stages. You will be asked what you want to do – we want to reset passwords:
    [image%255B20%255D.png]
  6. Choose Option 1 to Edit user data and passwords:[image%255B23%255D.png]
  7. Use Enter to choose the Administrator account:[image%255B26%255D.png]
  8. Type 1 to Clear (blank) user password. You should get back the message “Password cleared!”:[image%255B32%255D.png]
  9. Use Enter key again to reselect the Administrator account, for this time select Option 4 to unlock the account (even though this program tells you the account is already unlocked):[image%255B35%255D.png]
  10. when you can see “Unlocked!” you can quit from this program. The process to quit requires you to save your changes. Note: Default settings doesn't save changes, so you cannot now use Enter to select the default option.
  11. Enter ! to quit from the password reset program:[image%255B38%255D.png]
  12. type q to quit from the script and to ask about saving changes:[image%255B41%255D.png]
  13. type y to write back the files that have been changed:[image%255B44%255D.png]
  14. You should be seeing “***** EDIT COMPLETE *****”. Press Enter to finish the program scripts:[image%255B47%255D.png]
  15. At this stage you can remove the CD or remove/un-mount the iso image from your VM and press CTRL+ALT+DEL to restart the server. The server should now boot into Windows and auto-logon as it will be having a blank password.
  16. Change the password of your desiring and uncheck the “User cannot change password” setting.
Have Fun.

you can also check my other link as well:

http://solutionsspk.blogspot.co.uk/2015/12/solved-access-denied-for-local.html

(solved) Access Denied for Local Administrator User After Sysprep

Problem:

After VM creation VM is not fully sys-prepped and you cannot login using local Administrator User account.You see a error stating "Access is denied".
login1

Solution:

You can do following steps to solve this issue.
Insert the Offline NT Password & Registry Editor ISO and from there do the following:
  • Press enter (Select default)
  • 1 – Password reset SAM
  • 1 – Edit user data and passwords
  • 01f4 (this is my administrator user RID, enter would do this as its the default)
  • 1 – Clear (Blank) User Password
  • 2 – Unlock and enable user account
  • q – Quit editing user, back to user select
  • q – Quit (you will be asked if there is something to save)
  • y – Write files back (Default is not to save your changes)
  • n – Try again (Assume here that everything went well)
login3

Now remove the ISO and reboot into Windows, you wont’ have to enter a password,Fixeddddd.
Note: it would be a good idea to select ‘Generalize’ when sysprepping!

Have Fun!

(Solved) Repetitive Alerts [VMware vCenter - Alarm Health status changed alarm] com.vmware.vim.sms status changed from green to yellow

Problem:


Getting following alerts in the email frequently:

"Target: Datacenters
Stateless event alarm

Alarm Definition:
([Event alarm expression: Status change])

Event details:

vmware-dataservice-sca status changed from green to yellow"


Solution:


Actually it is a bug, you can fix it by following method:

  1. Log in to the vSphere Web Client with an administrative user.
  2. Click on top level (vcenter level).
  3. Navigate to Alarms.
  4. Go to Definitions.
  5. Edit “Health status changed alarm”  go to "Triggers" tab.
  6. Set status of the event  from “UNSET” to “ALERT” or others.
8. Click OK and then you're good to go (y)!.

Monday, 7 December 2015

(Solved) Exception Code 0xc0000005 Crash. Just Cause2 and for GTA-V

Problem:

Windows logs show following error/warning for crashing application:

Faulting application name: JustCause.exe, version: 1.0.331.1, time stamp: 0x552e6ef2
Faulting module name: unknown, version: 0.0.0.0, time stamp: 0x00000000
Exception code: 0xc0000005
Fault offset: 0x000000028034f49e
Faulting process id: 0x7ac
Faulting application start time: 0x01d07bbb26c375db
Faulting application path: P:\
JustCause\ JustCause.exe
Faulting module path: unknown
Report Id: 3b5a7330-e7bc-11e4-a41d-448a5b663f9d


Troubleshooting:

I have already done a full clean reinstall of my video drivers, changed out my RAM, repaired the game (i have the physical copy, not steam version) and a few other fixes that I cannot remember at this point. Nothing worked for me.

Solution:

1.

Delete the following 2 files: [cfg.dat] and [pc_settings.bin] in this Folder:

"C:\Users\YOUR-USERNAME\Documents\
JustCause\Profiles\ACCOUNT-CODE\" .


Or

2. 

You can delete the whole folder instead of just two files, this will be recreated on the next Run:

"C:\Users\YOUR-USERNAME\Documents\ JustCause"


Now just relaunch the game.

Note:

Don't forget to select right compatibility settings for you application before running it.


Have Fun.

(Solved) How To Clear Cache Memory on MS SQL Server on Windows Server 2008 R2

Problem:

MSSQL Server consumes high memory due to stored queries in its cache memory (as it is the default behaviour..).


Solution:

The solution to this however very simple:

Just go to services in the "Administrative Tool" then open "Services" (as administrator)

Now just "Restart"  "SQL Server (MSSQLSERVER)" service.


There will be a sudden drop in the Memory utilisation on the server.

Note: Sometimes there can come a downtime by this method but it is very minute (approximately for 1-3 seconds).

Here You Go (y) !.


Friday, 4 December 2015

[Solved] HP Proliant Host Baseboard Management Controller status Warning.

Problem:

Warning Alarm:

Host Baseboard Management Controller status alarm on HP Proliant DL380 G7 Server.

Host Baseboard Management Controller status

Solution

1.  HP Proliant DL380 G7 was built with the HP ESXi build, and the management agents are complaining because the iLO cannot acess the network.

2. While trying to connect with the iLO socket to the network the alarm will change as shown below.

Warning Host Baseboard Management Controller status

3. when you'll have disabled or connected to it you will be able to reset the alarm.

reset vmware alarm
4. log in and configure the iLO. Access it through internet browser (it will get a DHCP address automatically, you can also set a static IP address if you want to , by entering the iLO setup at boot (have a look at disabling iLO section below)).

5. Username will be Administrator (with capital A) and the password will be either on a pull out tab on the front of the server, or a brown cardboard label tied to the front of the server , or on a brown sticker on top of the server chassis or under the server lid.

iLOusername and password

6. Now you can log in and configure.

connect to iLO

Disabling the iLO


1. Restart the server, and  press F8 to enter the iLO setup when prompted.

iLO press f8

3. Select Settings > Configure.

configure iLO

4. You can also use the cursor keys to select and the space bar to enable/disable the options.

iLO options

5. Set all as disabled.

disable iLO

6. Have Fun.!

Thursday, 3 December 2015

[Solved] Recovery attempt is in progress and outcome will be reported shortly.Lost access to volume (Datatsore Name) due to connectivity issues.

Task & Events in the vSphere  vCenter  .


Task & Events in the vCenter showed lot of continuous “Lost access to volume (Datastore Name)..”  Following are the steps to solve the problem.


This was happening due to ESXi Management traffic and iSCSI traffic going on the same Network/subnet.

To keep same subnet:  We can either use Port Binding if we want  for iSCSI and Management traffic .

 On different subnet: we can configure iSCSi traffic .

In my case, I've configured different subnets for iSCSI management traffic. I've Dell SAN which has 4 RAID controllers. First I've created 2 new VLANS (102, 103) for iSCSI management traffic, and then configured 2 controllers on one subnet “VLAN102” and other controllers on subnet “VLAN103”.

Please follow the below steps to resolve the “Lost access to volume” issue.

    1-     Create 2 new VLANS in physical switchVLAN 102 and VLAN 103. 


    2-      Go to vCenter > Inventory > Networking > create 2 new Port Groups with the configured VLAN in physical switch as shown in the screenshots.


     3-      Newly Created Port Groups


iSCSI-VLAN-102   Port Group 1


iSCSI-VLAN-103   Port Group 2


    4-      To configure 2 new Virtual Adapters on ESX hostsIn our case we will configure for iSCSI-VLAN-102, iSCSI-VLAN-103.


    5-      Go to any ESX host where you want to configure Virtual Adapters, click on Configuration.


    6-      Under Configuration go to Networking, then click on vSphere Distributed Switch.


    7-      In vSphere Distributed Switch (vDS), click on Manage Virtual Adapters.


    8-      Select Add, click New Virtual Adapter.


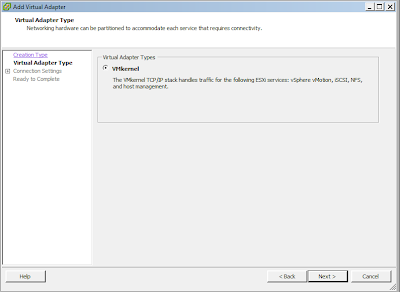
    9-      Click VMkernel in Virtual Adapter Types.


    10-  In  Add Virtual Adapter > Connection Settings choose the newly created port group in my case iSCSI-VLAN-102. Leave all the checks blank and click Next.


    11-  In VMkernel IP Connection Settings, assign IP Address from the new VLAN created in switch.


    12-  Click Next and Finish.


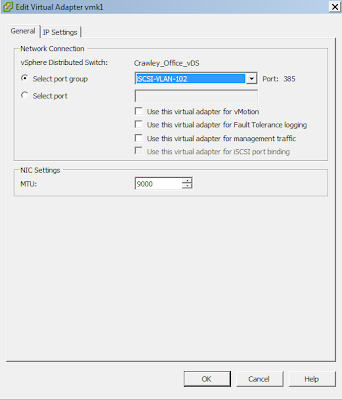
   13-  Once Virtual Adapter is added, change the MTU size by selecting Virtual Adapter and click Edit.


   14-  Note: Make sure you set the same MTU size as configured in your physical switch. By default MTU is set to 1500. As I’ve configured my switch with MTU size 9000 so I’ve also set the same MTU here.


    15-  Perform steps 8-14 to add another Virtual Adapter and at step 5 chooseiSCSI-VLAN-103 (2nd  Port Group).
  

    16-  Now it’s time to make changes at our storage device. In my case I’m usingDell SAN.


    17-  I had to change RAID Controller Network Configuration (iSCSI Ports) as shown in the below screenshot.


     18-  Once network configuration is done at Dell SAN, I had to discover my Dell SAN in vCenter under iSCSI Software Adapter > iSCSI Initiator “Static Discovery”


    19-  Click ok and perform Rescan so vCenter can discover Dell SAN with the newly configured IP Address configured from the new subnet.


    20-  After the discovery was successfully, “Lost access to volume” event was stopped appearing my vCenter Task & Events.


Note: - Make sure you remove old static discovery for Dell SAN in vCenter under  iSCSI Software Adapter > iSCSI Initiator.

How To Block An Application Using A Hash Rule.

Problem:

Sometimes we need  to stop users from running certain applications on there pc`s over network. Applications like messenger services or games etc. You can block any type of application from running on a windows domain with a simple GPO (Group Policy). The thing we enable is called a hash rule , We can enable it on the network to stop users from open application.
 

Solution:

Run The Group policy tool either the via console one or the Group Policy management console
Go To:
Computer Configuration > Windows Settings >Security Settings >Software Restriction Policies
At Software Restriction Policies folder Right click and select Create New Policies or New Software Restriction Policies. The software restriction tab will expand to show the following folders:
IT Tutorials
Select the Additional Rules Folder:
IT Tutorials
Right click on the additional Rules and click New Hash Rule.
IT Tutorials
Navigate to the app you would like to block…
IT tutorials
You can now apply the GPO to the users you require to block the app for.
Have Fun!.

(Solved) Windows Service Stuck At Stopping How To Kill

In order to avoid having to reboot a server in the middle of the day and  kill a service which is stuck at stopping
You can do the following steps:

Step 1. Find the Service Name.

Go to services and double click on the service which has stuck.  Note down the “Service Name”.

Step 2. Find the PID of the service.

Run command prompt as administrator and type in:
sc queryex servicename
("servicename" is the name of the service you obtained from the earlier step.)
Note down the PID

Step 3. Kill the PID

Type following command in the command prompt (as administrator):
taskkill /f /pid [PID]
Note1: Be careful of what process you are killing though.  If you kill some critical windows service you may end up forcing the machine to reboot on it own.
Note1: By forcing a service to stop you can also use these instructions to Kill a Windows Service which is stuck at starting as well.  This will help you in restarting service also.

Enjoy!

Tuesday, 1 December 2015

Forward Exchange 2013 Emails To External Contact (Solved).

Previously (before CU2) send email in exchange 2013 to an external contact via power shell, Now you can do it via the EAC also.  It is shown below we can do it via the EAC first,  you can furhur scroll down to see how to forward an email to a contact in Exchange 2013 powershell .

Send Email To An External Contact Via GUI / ECP

Start the EAC and create a new Mail Contact in Exchange 2013 with the correct name and External SMTP email address.
Recipients > Contacts
create exchange 2013 contact
Now browse to the mailbox that you would like to forward mail from to the new external contact and choose edit, then select Mailbox Features and then Mail Flow.
Now Recipient > Mailboxes > mailbox > Mailbox Features > Mail Flow
Exchange 2013 user mail flow
Now enable Mail Forwarding , select the Mail Contact we created in the earlier step.
You can do it quickly using powershell. Following are the commands on how to forward email in exchange to external contacts 2013 in power shell.

Exchange 2013 Powershell – Forward To External Contact

Command.
Set-Mailbox -Identity "Allen" -DeliverToMailboxAndForward $true -ForwardingSMTPAddress allen@hotmail.com

Description.
The command above will forward all emails from the mailbox “Allen” to Allen@hotmail.com and also leave a copy of the email in the Allen mailbox in Exchange 2013
Set-Mailbox -Identity “Allen” -DeliverToMailboxandforward $False -ForwardingSMTPAddress $Null -ForwardingAddress $Null
The command above will STOP the forward of all emails from the mailbox “Allen” to Allen@hotmail.com due to the $false command.
Note: After the -deliver use the “TAB” button to see all forwarding options.

And You're done (y).

Veeam Snapshot Removal Stuck with error : "VM needs disk consolidation".(Solved)

Problem:

VM1 (with big HDD) Snapshot removal task took  10.5 hours to complete. Once snapshot was removed, VM1 showed a warning in vCenter Summary that:

 "VM needs disk consolidation".  
Note: There was no snapshots left on VM1 under Snapshot Manager.

I tried to consolidate VM1 by going to VM > Snapshot > Consolidate but it gave the following error

"The maximum consolidate retries was exceeded for scsi0:1."

Solution:

I found that storage vMotion would resolve the disk consolidation issue and probably we won't need to consolidate the disk.

So I storage vMotion VM1 System Disk ( c: drive ) to another datastore. After the vMotion "VM needs disk consolidation" warning message was gone.

Then I started the VM1 Backup Job in veeam again Snapshot Removal took 12 mins but it went successful. The next Backup Job of VM1 took normal time to remove snapshot. 
So the issue is resolved ;-) .